

A soft, flexible gluten-free sourdough flatbread with the hearty flavor of whole grain flours. Easy to make and even easier to eat!
Looking for something specific?

And that pleasure is not limited to only the craft of wheated sourdough baking. It is entirely possible to bake a gluten free, whole grain, tasty sourdough loaf and once more enjoy the smell and taste of real fresh-baked bread.
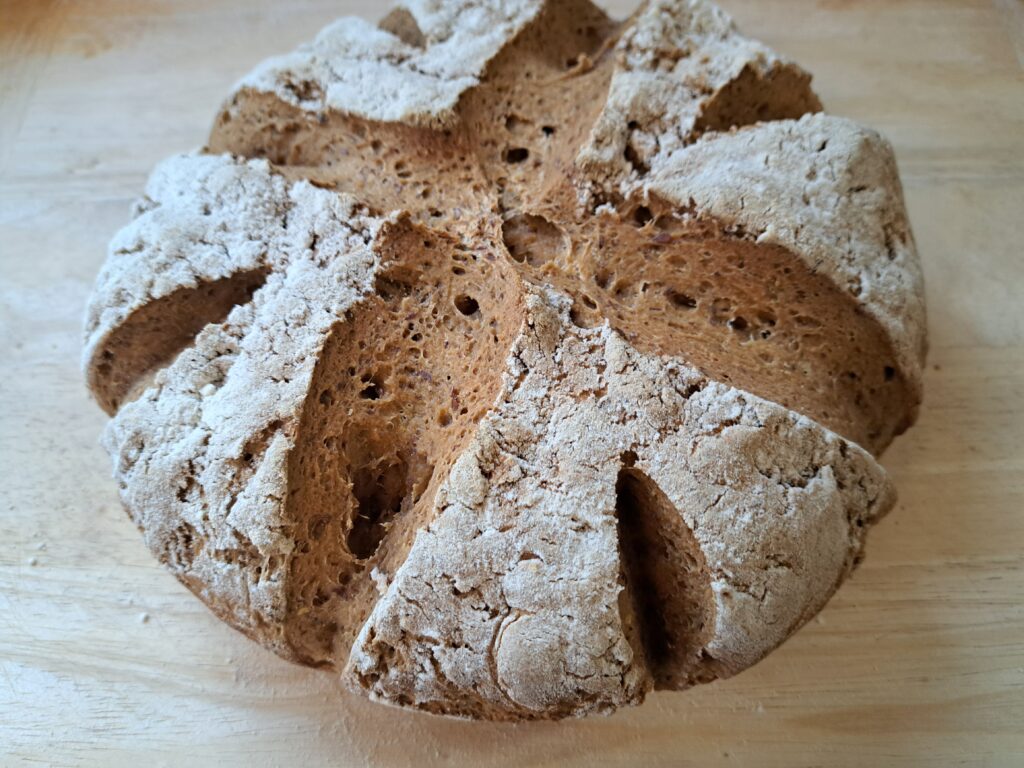
This gluten-free sourdough has a golden crust, a soft and tangy center, and the hearty flavor of whole grain flours. It is not a pale imitation of white store-bought bread, and it is not built from a long list of starches and fillers. This is a rustic homemade loaf, made with a gluten-free sourdough starter, and naturally fermented overnight.
Like most gluten-free bread recipes, this recipe works a little differently than traditional sourdough. Before you begin, it helps to understand what bread can (and cannot) do without gluten, and how to compensate for the differences.
;void(0); "Share on pinterest")
(1) In a large bowl or stand mixer, whisk together the brown rice flour, sorghum flour, teff flour, ground flaxseed (or chia seed) flour, and chickpea (or almond) flour. Add the sourdough starter and work it through the flour mixture until evenly distributed. The texture should resemble coarse sand.
(2) Add the baking powder and salt, then stir until fully incorporated.
(3) Warm 2 cups of the water. In a separate bowl (or your measuring cup), combine the warm water with the psyllium husks and let sit for about 3 minutes, or until the mixture thickens into a gel.
(4) Pour the psyllium gel into the flour mixture and stir until incorporated.
(5) Add the remaining 2 cups of water and continue stirring until a loose, wet dough forms. The dough will seem slightly too wet and sticky at this stage, but that is a good thing. It will firm up overnight as the flours fully hydrate.
(6) Sprinkle the top of the dough with a little extra brown rice flour, then cover the bowl with a damp towel. Set it in a warm place to ferment for approximately 8 hours, or overnight.
(7) Once the dough has fermented, preheat the oven to 400°F. Shape and score the dough, then place it in a cast iron bread pan or Dutch oven. Dust the top with a little more brown rice flour.
(8) Bake for 40 minutes, or until the crust is golden brown and the score lines no longer look raw.
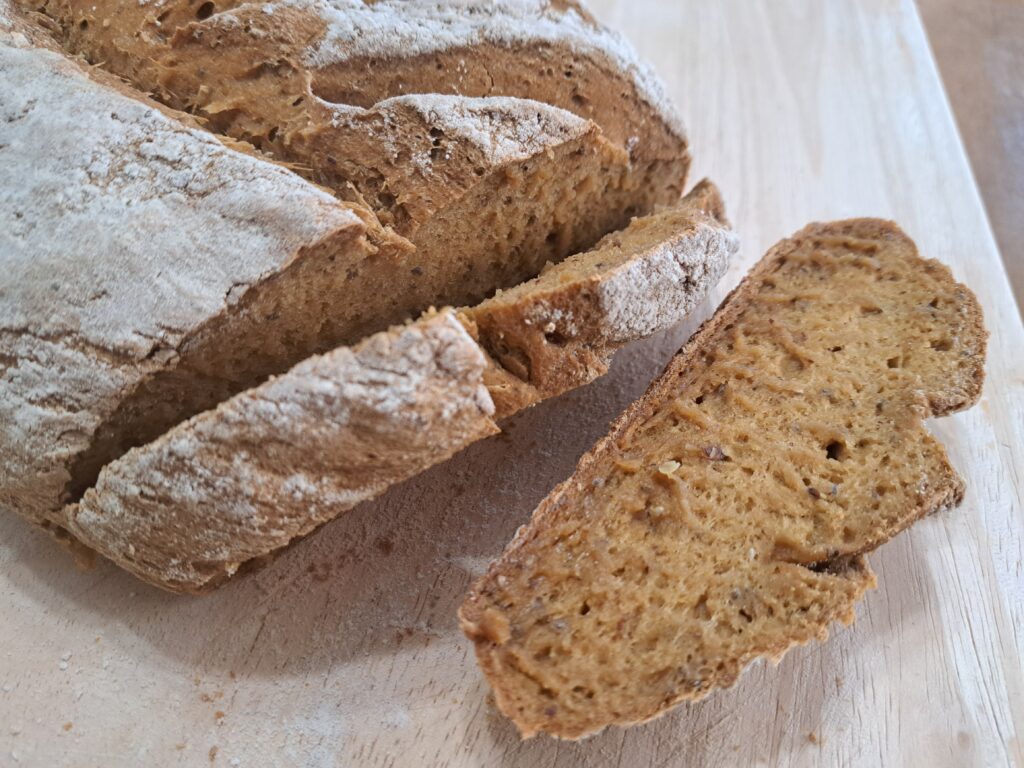
(9) Let the loaf rest for at least 15 minutes before slicing. Serve warm with butter or your favorite spread.
Bread, as a food type, is built around the properties of wheat. Or more specifically, it is built around the existence of gluten in wheat. Gluten gives dough its stretch, strength, and ability to trap air as it rises - which is why so many bread recipes talk about "developing the gluten." In gluten-free bread, we have to build that structure another way.
This recipe uses a combination of whole grain flours, protein-rich ingredients, and binders like psyllium husk and ground flaxseed to create a dough that can hold together, ferment overnight, and bake into a delicious loaf. Each ingredient has a job to do, and understanding the interaction of those ingredients makes gluten-free baking much easier and more flexible.
Gluten Free Sourdough Brown Bread
I like to use a combination of brown rice flour, sorghum flour, and teff flour in this bread. The brown rice flour absorbs water well, helps hold the dough together, and gives the loaf a softer texture. Sorghum flour is a hearty whole grain flour with a mild flavor and just a hint of natural sweetness. Teff flour is also a deeply flavorful whole grain flour; it gives the bread its beautiful brown color and adds a slightly earthy, almost caramel-like flavor.
While I very much enjoy this specific combination, this is also one of the more flexible parts of the recipe. You can substitute in other whole grain gluten-free flours and still get a good loaf. Buckwheat flour, for instance, would work well in place of either sorghum or teff. Sweet white rice flour can also be used for part of the flour blend if you want a lighter, softer, slightly more moist texture.
For best results, I suggest keeping the brown rice flour as part of the base, and then experimenting with the other whole grain flours according to taste and pantry availability. If you are curious, you can read more about the properties of brown rice flour and sorghum flour in my gluten free baking guides.
This recipe relies on a combination of psyllium husk and either flaxseed or chia seed to bind the dough together and hold moisture. In the absence of gluten, binders are incredibly important. Many gluten-free recipes use xanthan gum, guar gum, or a flour blend that already includes one of the two for this reason. I am not a fan of either gum. While they are not "unnatural" ingredients, they are processed ingredients, and do not seem particularly food-like to me.
Psyllium husk provides a great alternative. As its name suggests, it is the husk of a seed, and when given enough water, it forms an elastic gel. That gel helps mimic the stretchiness that gluten usually gives to bread dough. Dough made with psyllium husk can, with care, be shaped more like wheat dough, and it helps avoid the dry, crumbly texture often associated with gluten-free breads.
I use the whole psyllium husks in my baking, and the measurement given reflects that. You can also buy psyllium husk powder. If you do decide to use psyllium husk powder instead, then you only need to use 4 tablespoons on this recipe.
Flaxseed meal and chia seed flour both play a supporting role to the psyllium husk in this recipe, and the choice between them comes down mostly to personal preference. I have used both to good effect. These little seeds provide fat, protein, and, like psyllium husk, create a gel when exposed to water. That gel helps improve the texture of the dough and makes the finished loaf softer and less crumbly.
Chia seed tends to make the dough a little more gummy, while flaxseed gives a slightly softer, more familiar bread texture. Either one will work, so use whichever you prefer or already have on hand. If you want to read more about these two seeds, check out my flaxseed and chia seed baking guides.
Though you might not think it, protein plays a key role in bread. Wheat flour tends contains 12-15 grams of protein per 100 grams of flour, depending on the type of wheat used.[source] Much of that protein is gluten, which is why wheat bread can stretch, rise, and hold its structure so well. Protein also helps make bread more satisfying, and contributes to the texture and body of the finished loaf.
In contrast, brown rice flour and sorghum flour contain only 7-8 grams of protein in the same amount of flour, and they are not outliers among gluten free flours. Many gluten free flour options are higher in starch and much lower in protein than wheat. Teff is an exception, with 12-13 grams of protein, but a loaf made entirely of teff flour would be quite dense.[source] The solution, then, is to add back in some protein content with a high protein "flour" like almond flour or chickpea flour.
This recipe works equally well with either almond or chickpea. Almond flour averages about 26 grams of protein per 100 grams,[source] while chickpea flour is also protein-rich at about 22 grams per 100 grams.[source] With both options similar in terms of protein content, the choice is entirely a matter of taste and ease of acquisition. Chickpea flour is a little bit more earthy, while almond flour is less likely to impact taste but will still add richness.
Sourdough starter is what makes sourdough its delicious, tangy self. And while a gluten-free sourdough starter may not rise quite as aggressively as its wheat-based equivalent, the logic is still basically the same: grow your own, or acquire some from another gluten-free baking enthusiast.
A sourdough starter is simply a living mixture of flour, water, and wild yeast. With regular feeding, it becomes bubbly, active, and ready to add flavor and fermentation to breads, biscuits, flatbreads, pancakes, and other baked goods. My starter is currently fed with sorghum and teff flour, though brown rice flour, sorghum, millet, and buckwheat can all work well for gluten-free sourdough starter.
For this recipe, you will need an active gluten-free sourdough starter that has been fed recently and is showing signs of life — bubbles, a pleasant sour smell, and some rise between feedings. If you do not have one yet, start with my full Gluten-Free Sourdough Starter guide, which walks through the simple flour-and-water process from the first feeding to a usable starter.
I usually mix up the dough in the evening, cover it with a damp towel, and let it rise overnight in the oven with the light off. By morning, the dough should look noticeably puffed and increased in size - ideally close to doubled. That long, slow fermentation is what gives the loaf its lovely tangy flavor and a little bit of rise.
Now the rise of a gluten-free sourdough is a little different from a traditional wheat loaf. Gluten-free dough does not have the same stretchy structure to trap air, so it has a slightly less dramatic rise than a wheated sourdough loaf. That is normal; it just needs to double in volume once, not go through multiple rises and kneading. The dough will also firm up as it rests, because the whole grain flours, seeds, and psyllium husk continue absorbing water overnight. So the slightly-too-wet dough of the evening will become a nice workable dough by morning.
I also use baking powder in this recipe. While the sourdough starter provides flavor and fermentation, I have not mastered a gluten-free loaf that relies entirely on the starter for lift. The extra leavening helps give the bread a better rise while baking and thus a better crumb when done.
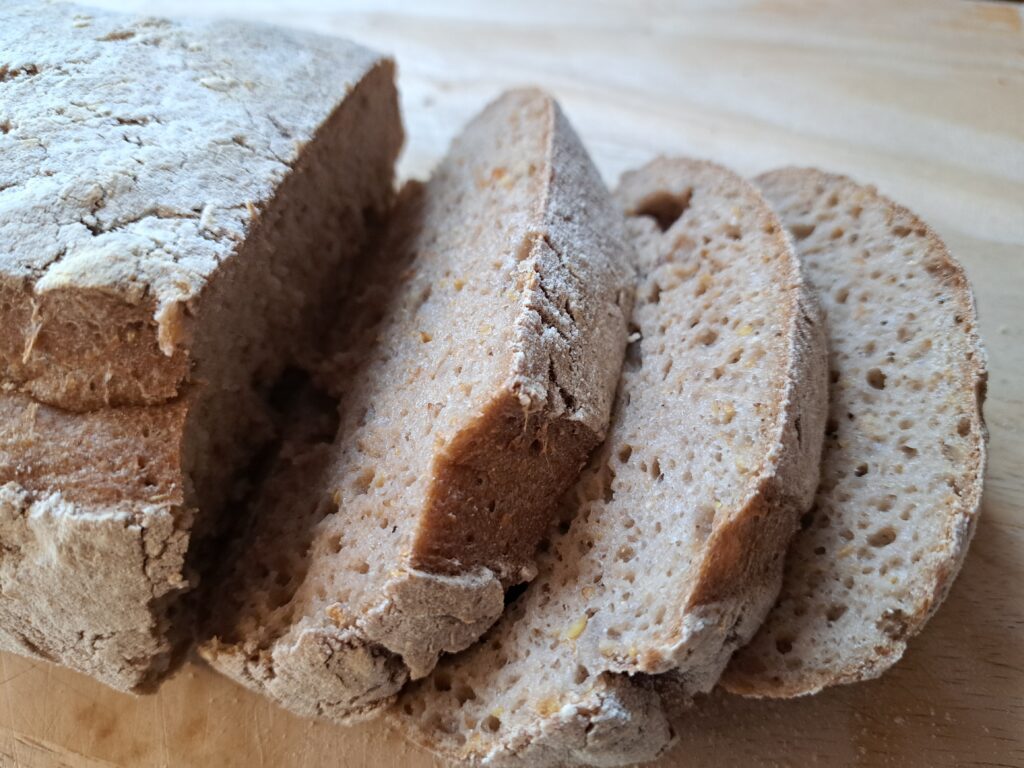
This is the texture you are going for: small evenly distributed bubbles and no gumminess in the middle.
In general, leaving the dough overnight in the oven (8-10 hours) gives me a great rise. But sourdough is very location and temperature dependent. In the winter, I often find myself needing to pre-warm the oven in order to give the dough the boost it needs to double by morning. If the dough does not double, then you risk the loaf being too dense.
On the other hand, if the dough is allowed to ferment for too long, it can turn gummy in the center. This "gummy" effect may make you think that it has not been baked long enough, but it is actually caused by being left to rise over-long. So if you encounter this, either cut short your fermentation time by an hour or two, or let it ferment in a cooler location (for instance, on the counter instead of the oven).
Unfortunately, the entire sourdough process is highly sensitive to your climate and the wild yeasts local to your area. So there is no substitute for trial and error to find the timing that works best for you!
I bake this bread in cast iron because it gives the loaf a stronger, crustier finish than a lightweight pan. Cast iron holds heat beautifully, so once it is hot, it surrounds the dough with steady, even heat and helps the outside of the loaf set into a golden crust. If you use a cast iron Dutch oven with a lid, it also traps steam during the first part of baking, which helps bread rise before the crust fully sets. Then, as the bread finishes baking in drier heat, the crust can firm up and become crisp.
That said, you can still make this recipe without cast iron. Use a sturdy metal loaf pan, a glass bread pan, or another oven-safe baking dish, but expect a slightly softer crust and possibly a few extra minutes of baking time. If the loaf seems to be browning too quickly on top before the score lines look fully baked, tent it loosely with foil and continue baking until the crust is firm and the center no longer looks wet. For a crustier finish without cast iron, place a small pan of hot water on the lower oven rack for the first 15–20 minutes of baking, then carefully remove it so the bread can finish in a drier oven.
(But if you do find yourself in need of a cast iron pan, I greatly recommend this dutch oven from Lodge. I have been baking with it for over 5 years, and it is amazingly versatile.)
I make bread every few days, so bulk gluten-free flours, a good stand mixer, and cast iron baking pans are staples of my kitchen. Here are some great tools and supplies for starting your own sourdough baking journey.

Yes. The brown rice flour, sorghum flour, and teff flour can all be substituted for other gluten free flours (minus coconut - coconut flour requires too many special adjustments). I have used buckwheat and sweet rice flour in this recipe to good result.
For more information on substituting in other flours, check the recipe notes.
No. Sourdough is often touted as being easier to digest than un-fermented bread, but fermentation does not remove the gluten. In order to have gluten free sourdough bread, both the dough and the starter need to only use gluten free flours.
No, but I very much recommend using cast iron! It helps give the bread a good crust.
If, however, you want tips on how to bake this bread without the aid of a cast iron pan, check out my recipe notes.
Yes. Just reduce the total amount of psyllium to 4 tablespoons if using the powder.
I usually allow my dough to rise for 8-10 hours in the oven (usually overnight). But this is very temperature dependent.
For more tips on how to find the right proofing time, read my recipe notes.
There are two possibilities. First, the dough may have been over-proofed (allowed to rise too long). If this is the case, then you will need to cut down your rise time by an hour or two, or set the dough to proof in a cooler location. You can read more about the starter and proofing in the recipe notes.
The other option is that you did not allow the bread to rest long enough after taking it out of the oven. Allowing the bread time to cool off before you cut into it greatly improves the texture, and keeps it from compressing and getting too gummy. The bread should be allowed to rest and cool for at least 15 minutes before cutting (though leaving it for an hour or two is even better!)
No. Kneading is part of baking with wheat, because of how gluten works. In a gluten-free loaf, there is no purpose to kneading the dough.
It takes a bit of time, after all, to maintain a sourdough starter and regularly bake fresh bread. Which raises the question - is all this effort worth it?
I make bread every few days, so of course my answer is an enthusiastic yes. While gluten free options are becoming more common all the time - in supermarkets, and even in the occasional dedicated gluten-free bakery - many of these options suffer from the same issues. So many store-bought gluten free breads are overly dry, crumbly, or stale tasting. They are serviceable when toasted, buttered, or used as sandwich bread. But on their own, they leave a great deal to be desired.
The reason for this is that most of these store-bought gluten free breads are made primarily from starch, not whole grain flour. Presumably they do this to mimic white wheated bread, but the end result is not remotely similar. And it is probably not very good for you either.
So the solution is to make your own bread.
In addition to being able to use good quality whole grain flour in your bread, baking at home lets you take advantage of the magic of fermentation. During that long, slow rise, the yeasts and bacteria in the starter begin working on the flour before the loaf ever reaches the oven. They create the tangy flavor and aroma we associate with sourdough, while also breaking down some of the more complex parts of the grain.
That slow breakdown is part of what makes sourdough different from a quickly mixed loaf. Fermentation essentially gives digestion a head start, making some of the nutrients in the flour more available in the finished bread. Micronutrients such as calcium, sodium, zinc, and magnesium are present in many flours, including gluten-free ones, but are not always easy for the body to extract. FODMAPs - a type of carbohydrate some people have trouble digesting - are also broken down in the fermentation process, meaning that sourdough bread is less likely to cause bloating.[source] In other words, sourdough does not just taste nicer; the fermentation process unlocks the nutritional potential of your loaf.
Sourdough bread is not naturally gluten free. Traditional sourdough bread is usually made with wheat flour, and wheat contains gluten. Fermentation may change the digestibility of bread, but it does not make a regular wheat sourdough loaf safe for someone with celiac disease or a serious gluten intolerance.
That is why this recipe starts with gluten-free flours and a gluten-free sourdough starter. You still get the flavor and benefits of a long, slow fermentation - the tangy flavor, the better texture, the wonderful fresh-bread smell - without relying on wheat. It is not about making wheat sourdough “safe.” It is about building a naturally fermented loaf from gluten-free ingredients from the beginning.
And that, to me, is the real virtue of homemade gluten-free sourdough. You get to choose whole grain flours, avoid the starch-heavy loaves from the grocery store, and create something that actually feels like bread again: crusty, flavorful, nourishing, and worth slicing warm from the pan.
Once you have a healthy starter going, bread is only the beginning. That same tangy, bubbly starter can be used in all sorts of gluten-free bakes, from flatbread to biscuits and beyond.
A soft, flexible gluten-free sourdough flatbread with the hearty flavor of whole grain flours. Easy to make and even easier to eat!
Fluffy and buttery, these gluten-free sourdough biscuits are an easy homemade side for breakfasts or comfort-food dinners.
The key to unlocking all the flavor and nutrition of Sourdough in your gluten free baking. A little bit of patience can lead to a delicious and unique gluten free sourdough starter.

