The creamiest custard pie you will ever taste, in a gluten free crust. Enjoy warm from the oven, or chilled the next day.
Looking for something specific?

With its familiar aroma of spice and the smooth custard filling, the place of pumpkin pie on the Thanksgiving table is nearly as essential as the turkey itself. There's no reason anyone should be excluded from enjoying pie just because they can't eat wheat! And fortunately, its easy to make a delicious gluten-free pumpkin pie from scratch. This recipe simply updates the old traditional pie with new grains.
(Not that you should limit yourself to only enjoying a from-scratch gluten-free pumpkin pie at Thanksgiving. Feel free to conjure the taste of fall any time of year!)
Making a pie gluten free is nowhere near as challenging as making gluten free bread or cookies. The main source of potential gluten is the pie crust itself, for which you can use either nut or grain based flours. The texture does change a little, of course. The flakiness can be a little harder to achieve, and the pie dough will be a little bit more delicate. But let's face it - the crust was always a vehicle for that delicious custardy filling. And a good, satisfying, buttery gluten free crust is very achievable.

;void(0); "Share on pinterest")
(1) Preheat the oven to 375°F.
(2) Prepare your pie crust. If using my pie crust recipe, add 1–2 tablespoons of sugar and a pinch of ground ginger to the dough to complement the pumpkin filling.
(3) Roll out the crust, place it in a 9" deep dish pie plate. Crimp or decorate the edges as desired.
(4) Line the crust with parchment paper and fill with pie weights or dry beans. Put the crust in the oven to bake for 10 minutes, until it is just beginning to turn light golden. This helps prevent a soggy bottom crust. Remove from the oven and set aside.
(5) While the crust bakes, prepare the filling. In a large bowl, whisk together the pumpkin puree, eggs, cream, and milk until smooth.
(6) Add your dry ingredients to the wet mixture: sugar, brown rice flour, salt, cinnamon, ginger, nutmeg, and cloves. Mix until fully combined. If your filling looks bubbly after whisking, give it a few minutes to settle. Bubbles don't effect the taste, but they might cause marks in your pie.
(7) Pour the filling into the warm crust. Avoid overfilling, as the custard will expand slightly during baking. A deep-dish pie crust should hold most or all of the filling.
(8) Bake for 50 to 60 minutes, until the edges are set and the center no longer jiggles when gently shaken. If needed, add additional time in 5-minute increments.
(9) Allow the pie to cool completely, about 2 to 3 hours, before slicing. This allows the custard to fully set. Serve slightly warm or chilled.
I recommend using my pie crust recipe with this pie. It holds together well, allowing you to roll it out and decorate it almost as well as a wheat-based crust. It is also wonderfully buttery and a great complement to the pie. I like to add a little bit of sugar and spices to the crust, in order to complement the filling. I find that a less sweet filling with a slightly sweet crust makes for the perfect pumpkin pie.
If you don't have time to make a crust from scratch, however, don't panic! A store bought crust will do just fine. Just keep in mind that this recipe does make enough filling for a deep dish pie, and many store bought gluten free pie crusts are shallow. Consider halving the filling recipe if you go with a store bought crust.
You can find my gluten free pie crust recipe here. It makes enough dough for a deep dish bottom crust, with a little extra if you wanted to do some fancy decorations.
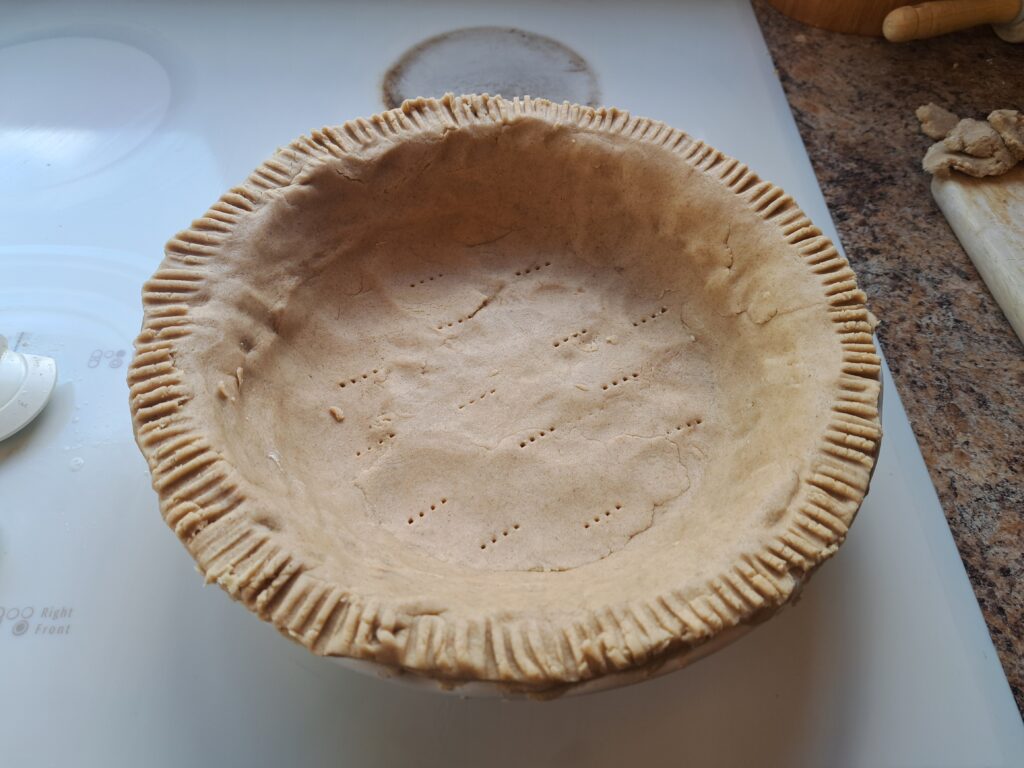
A gluten free pumpkin pie crust, ready to be baked
Also known as blind baking, parbaking is a fancy term for baking the crust before adding any filling. I recommend parbaking the crust for a pumpkin pie, in order to avoid any sogginess on the bottom - after all, the filling is quite liquid when added, and can easily soak the bottom crust.
Blind baking is done by lining the unbaked crust with parchment paper and filling it with pie weights. The weights hold the dough in place and prevent the bottom from puffing up or the sides from sliding down as the butter melts. This helps the crust keep its shape and creates an even surface for the filling. If you do not have pie weights, dry beans work just as well and can be reused for baking in the future.
If you have neither pie weights or dry beans, you can parbake without weights. Your bottom crust just might be a little uneven or puffy. This doesn't effect the taste at all, just the aesthetics. So don't let the lack of weights keep you from blind baking your crust!
Parbaking does not take long: just ten minutes for this recipe, during which time you can mix up the filling.
I adore a deep dish pie, and portion my recipes accordingly. There is just something so satisfying about a nice big bite of filling contained in a buttery crust. The proportions feel right. I personally bake all my pies in deep dish ceramic pie plates. They are reliable, easy to clean, and aesthetically pleasing.
But I realize that not every pie plate is deep, and store bought crusts often come in a shallower size. If you happen to have a regular depth pie plate instead of a deep dish, you will want to make less filling: half to 2/3rds of the recipe as written.
Alternatively, if you are in the market for a new pie plate, I have been using this set of two deep dish pie plates for the last several years, and they have been great. If you prefer a US based company, this Mora Ceramics deep dish pie plate is also a great choice.

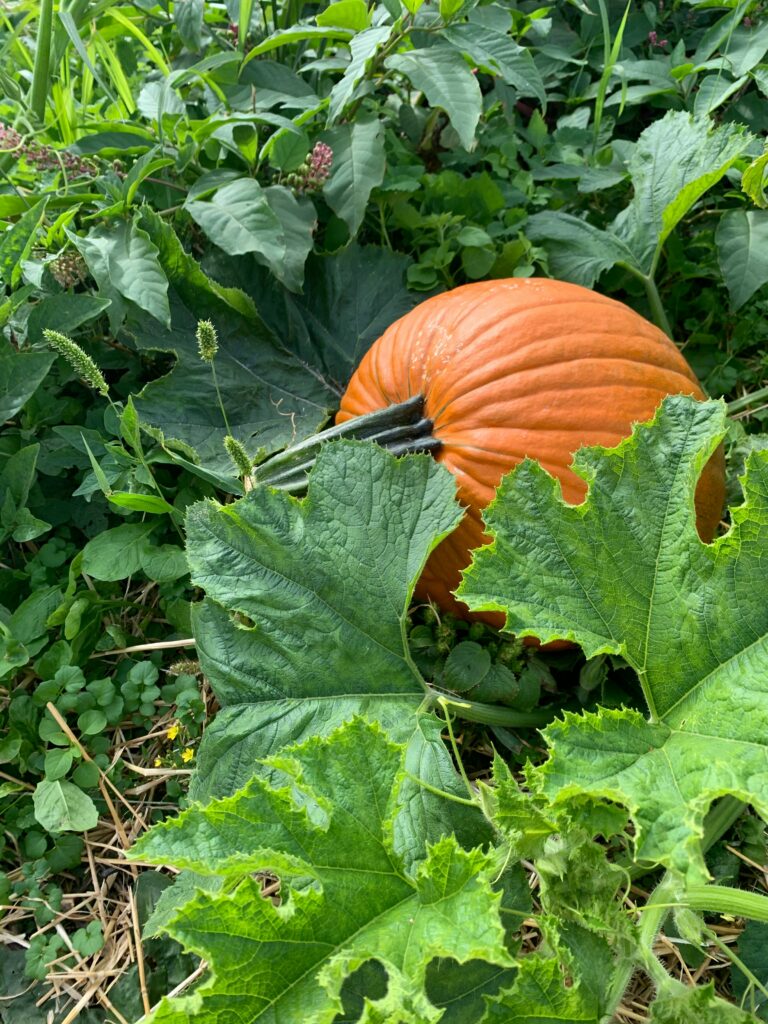
Homegrown pumpkin, ready to be processed
The default for pumpkin pie is to used canned puree from the store. You see this repeated in recipes everywhere, and praised in recipe blogs across the internet. Its cheap, its easy, and the puree is smooth. We just take it for granted. But here's the thing: there's a depth of flavor in fresh pumpkin that you don't get in those cans. And once you get used to using fresh pumpkin, you just might realize how very... tinny... those canned pumpkin purees taste.
Its not difficult to make your own pumpkin puree at home. In fact, making your own pumpkin puree is no more complicated than boiling or roasting potatoes. You can make it in batches well ahead of any pies.
On years where I have been lucky enough to plant my own pumpkin vines, I've been able to process my very own garden pumpkins for pies. Growing my own pumpkins meant that I could try different varieties. Illinois is a prime pumpkin growing state (see more on that below!), so the vines tend to be quite prolific here. But if you don't have the time - or space - to grow your own pumpkins, many grocery stores carry pie pumpkins in the fall. Every year I make sure I have 6-7 pie pumpkins to process. After cooking them down, I freeze them, and have fresh pumpkin ready to use through the rest of the year!
To start with, you want to make sure you have pie pumpkins. You can cook down a big ornamental jack o' lantern pumpkin and eat it, but the flesh tends to be stringier. Pie pumpkins are specifically bred to have dense sweet flavorful flesh that cooks down into a nice smooth puree suitable for baked goods. They are mid-sized pumpkins, usually around 6-8 inches around. If your grocery store carries them, they are usually labeled as pie or sugar pumpkins.
You won't be eating the skin of the pumpkins, but very often there's still a little dirt from the fields on them. Wash before proceeding!
Once you have your pie pumpkins, here's what you do:
And that's it! You have pumpkin puree, ready to be baked into a pie, bread, scones, or other favorite pumpkin recipe. I usually freeze the pumpkin in quart containers or bags, and just get them out of the freezer the day before I want to use them. Each pie pumpkin yields ~4 cups of puree, or enough for 2 pies!
Yes! Store bought gluten free crusts can be pretty good. Just keep in mind that this recipe is for a deep dish pie, so adjust accordingly, as I described here.
Yes. While I developed and tested this recipe using homemade fresh pumpkin, you can used canned pumpkin in a pinch. Replace the two cups of pumpkin puree with one 15oz can of canned pumpkin puree.
No. Pumpkin pie filling comes already sweetened. This recipe assumes that you are just using pumpkin puree, which is nothing but pure pumpkin.
Yes, but the gluten is usually contained in the crust. Sometimes flour might also be added to the filling to thicken it, but aside from that, pumpkin pie filling is usually gluten free.
And it should go without saying, but this recipe is entirely gluten free!
Wiggle the pie slightly. If the center wobbles, the pie needs a few more minutes.
When done, the center will puff up, and be completely "set" and non-jiggly.
I suggest parbaking (or pre-baking) the crust. You can read more about this in the recipe notes.
Now that the practical details are out of the way, let's step back for a moment to appreciate where this pie comes from. Pumpkin pie is more than just a reliable holiday dessert. It is part of a much older story, one that begins in early American kitchens and continues today, especially here in Illinois, where pumpkins are still grown in abundance.
Pumpkin is a New World food and was not part of the European diet before the colonization of the Americas. Long before that, however, pumpkins and other squash were cultivated and used as staple foods by Indigenous peoples for thousands of years. They were valued for their productivity, storage life, and versatility, and were prepared in many different ways depending on the region and season. But they weren't baked into pies.[source]
Pies are a very Old World dish.[source] When English colonists arrived in North America, they quickly adopted pumpkin into their own cooking. And while the ingredient itself was entirely new to them, the idea of baking food in a pastry crust was deeply familiar. Pie, after all, was a well-established part of English food tradition. In this way, pumpkin pie became a true meeting of Old World and New World cooking, combining a native American crop with a European technique.
Even the name reflects this layered history. The word pumpkin comes from older word pumpion, which traces its roots back through French and ultimately to ancient Greek, where it simply meant "melon."[source] While pumpkins and melons seem quite different to us today, both belong to the broader family of gourds, and the colonists classified them accordingly.
By the 1600s, pumpkins had become a regular part of the New England diet. Being a native plant, they were easy to grow, and were used in soups, stews, and early forms of pie. These first pumpkin pies were not the smooth custard we know today. Instead, they were often made by layering sliced pumpkin with spices inside a crust.
Over time, the recipe evolved. By the late 1700s, cooks began stewing or roasting pumpkin and combining it with eggs, cream, sugar, and spices to create a smooth custard filling.[source] This version proved enduring, and it remains the foundation of pumpkin pie today.
While pumpkin pie began in the kitchens of New England, its center of gravity has shifted over time. Today, the heart of pumpkin production lies firmly in the Midwest, and especially here in Illinois. And in case it was not enough that pumpkin pie is delicious and a Thanksgiving staple, it is also the official state pie of Illinois. Since 2015, pumpkin pie has held that distinction, recognizing the important role pumpkins play in the state’s agriculture.[source]
Illinois produces roughly 85 percent of the pumpkin consumed in the United States, much of it grown in the rich farmland of central Illinois. These pumpkins become the fillings of countless pies each year, connecting local fields to tables across the country.
So if you are from Illinois, enjoying a slice of pumpkin pie is more than just a seasonal pleasure. It is a small way of participating in a tradition rooted in the land itself. Baking it yourself, especially with fresh pumpkin and whole-grain gluten-free flours, continues that tradition in your own kitchen. Click the button below to see the full recipe and instructions.
The creamiest custard pie you will ever taste, in a gluten free crust. Enjoy warm from the oven, or chilled the next day.
A buttery gluten free pie crust that you can use for any sort of sweet pie: fruit, custard, or no-bake. Not only is the taste delicious, but it is workable, rollable, and even sturdy enough for beautiful pie crust decorations.

